Bart Support
Search settings
In this section you can learn more about ‘Search settings‘ in ‘Adminstration‘. Having search settings that that align with your organisations needs will help your users find and filter the most relevant search results for them, while surfacing only the information you want to expose your users to.
Synonyms
Summary
Be able to manage the ‘Search synonyms’ for users on your intranet. Implementing search synonyms improves search accuracy and user experience by ensuring relevant content is found regardless of terminology variations. This feature enhances content discoverability and reduces user frustration by matching queries with related terms.
Steps
- Navigate to the ‘Workbar’ and select the cog icon (Administration)
- You will be directed to the ‘Administration’ screen
- Select the ‘Search‘ dropdown
- You will be redirected to the ‘Search Synonyms‘ page
- Select ‘Add Synonym‘
- Input the ‘Term‘ and ‘Synonym‘
- Choose to select the checkbox for ‘Bidirectional synonym‘ (A bidirectional synonym is a pair of words or phrases that are interchangeable in both directions in search, meaning each term can be used to return results the other)
- Select ‘Save‘
- Choose whether to ‘Download’ or ‘Export’ the synonyms
To ‘Edit‘ or ‘Delete‘ the Synonyms, select the three dots icon

Synonyms in Search settings
Promoted search
Summary
Be able to manage ‘Promoted search results’ on your intranet.
Promoted search results allow you to promote certain content items to the top of search results. For example, if someone were to search ‘GDPR’, you could make it so that any content associated with the promoted search result GDPR will appear at the top of your users’ search results.
Steps
- Navigate to the ‘Workbar’ and select the cog icon (Administration)
- You will be directed to the ‘Administration Screen’
- Select the ‘Search‘ dropdown, then the ‘Promoted search’ tab
- You will be directed to the ‘Promoted search’ screen
- To create a promoted result, select ‘Add promoted result’
‘Add promoted result’ screen
- You can input the ‘Name’ and ‘Description’
- If multiple results related to the same topic are promoted, you can choose the order in which the promoted results display in Search.
- You can create a list of promoted items.
- You can choose whether to publish the promoted result or not.
- You can ‘Cancel or ‘Save’ the changes.
- You can change the order of the items in the table by selecting the drag handle button and moving the items
- You can ‘edit’ and ‘delete’ the items by selecting the options menu (3 dots)
- You can ‘Save’ the changes
- You can reset the items in the table to alphabetical order by selecting the ‘Reset to alphabetical order’ button

Promoted search in Search
Display extended search bar
Summary
Be able to display an ‘extended search bar’ on your intranet.
Steps
- Navigate to the ‘Workbar’ and select the cog icon (Administration)
- You will be directed to the ‘Administration Screen’
- Select the ‘Search‘ dropdown, then the ‘Display extended search bar’ tab
- You will be directed to the ‘Display extended search bar’ screen
- To display an extended search bar instead of the search button in the Workbar, select the checkbox.
- You can also customise the default ghost text that will appear in the extended search bar on this screen.
- You can save the changes by clicking the ‘Save’ button

Extended search bar in Search

Default search icon in workbar
Extended search bar enabled in the workbar
Search results
Summary
Be able to display an ‘search results’ on your intranet.
Steps
- Navigate to the ‘Workbar’ and select the cog icon (Administration)
- You will be directed to the ‘Administration Screen’
- Select the ‘Search‘ dropdown, then the ‘Search results’ tab
- You will be directed to the ‘Search results’ screen
- Configure the ‘Types‘ between ‘Content types‘ and ‘App‘
- Select the ‘Fields‘ tab
- Select the ‘Checkbox‘ of the ‘Content‘ you would like to display
- Select the ‘Checkbox‘ for ‘People‘, ‘Teams‘ & ‘Locations‘
- Select ‘Save‘
- Select the ‘Settings‘ tab
- Input the ‘Relevant fields‘
- Select ‘Save‘
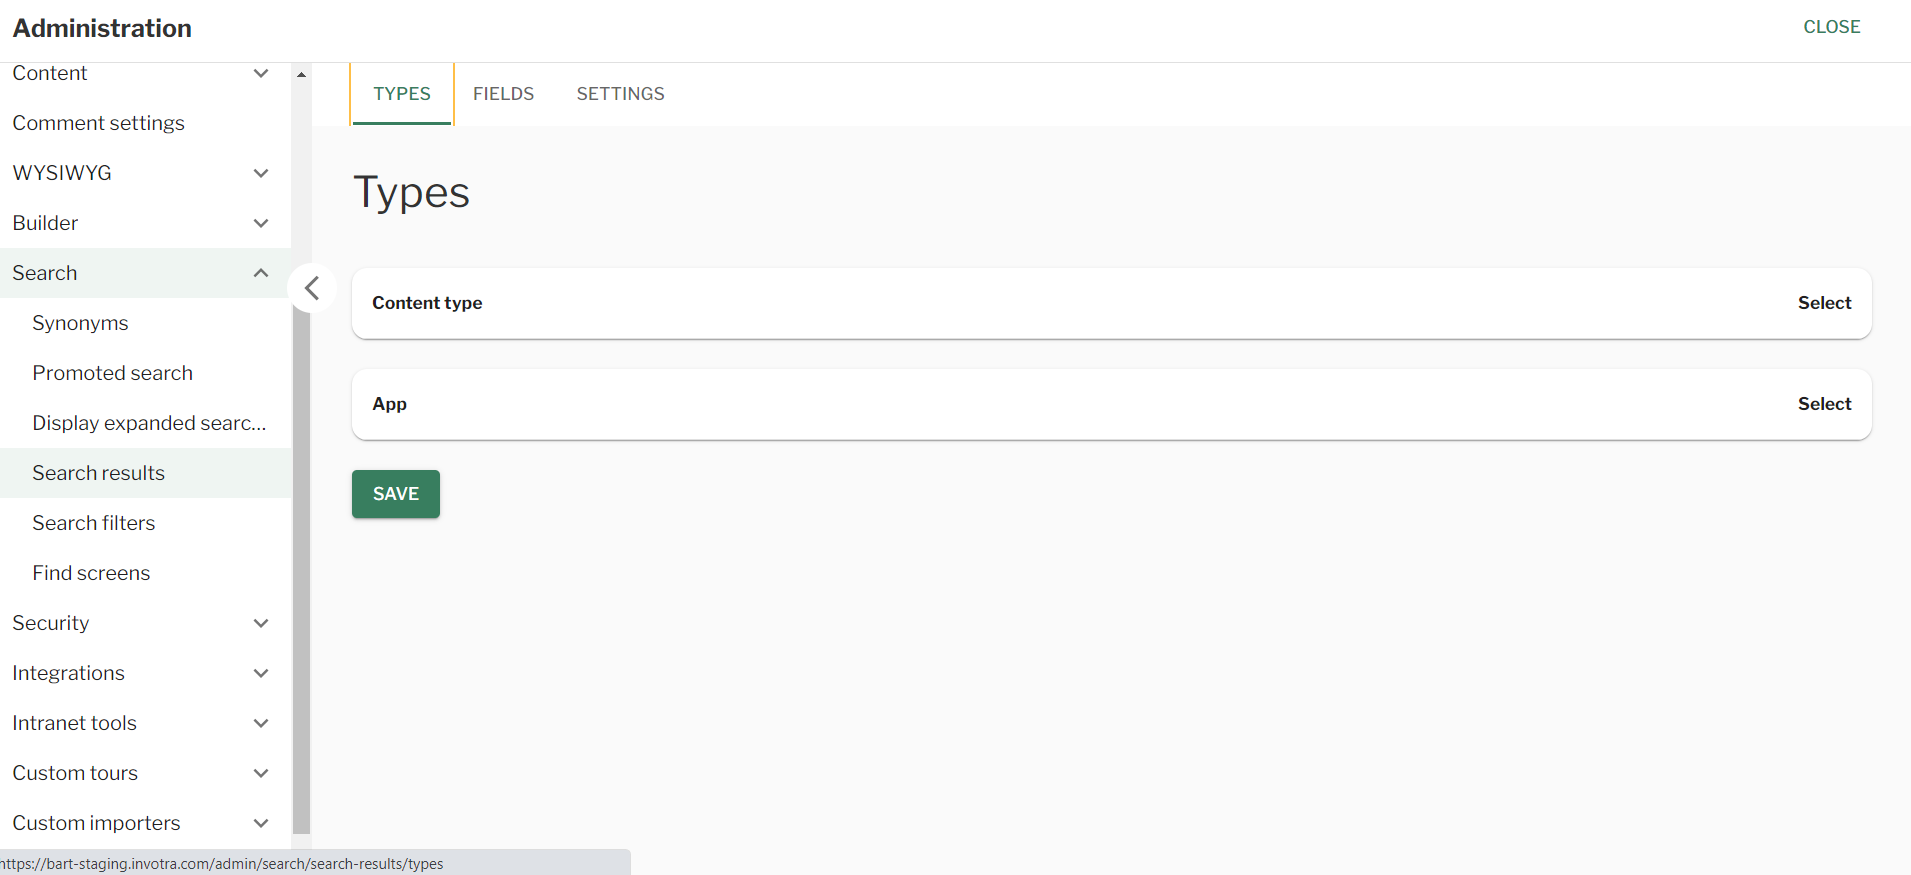
Search results in search settings
Search filters
Summary
Be able to display an ‘search filters’ on your intranet.
Steps
- Navigate to the ‘Workbar’ and select the cog icon (Administration)
- You will be directed to the ‘Administration Screen’
- Select the ‘Search‘ dropdown, then the ‘Search filters’ tab
- You will be directed to the ‘Search filters’ screen
- Input the ‘Title‘ and select the ‘Checkbox‘ of the status
- Select ‘Save‘
- Repeat these steps for the following tabs:
- Team Search Filters
- Locations Search Filters
- Content Search Filters
- Select either ‘Save‘ or ‘Reset to default‘

Search – search filters
Search result fields
Summary
Be able to configure the fields displayed for search results on both
- Global search
- Find screens (Home)
Steps
- Navigate to the ‘Workbar’ and select the cog icon (Administration)
- You will be directed to the ‘Administration Screen’
- Select the ‘Search‘ dropdown, then the ‘Search results’ tab
- Select the ‘Fields’ tab
- Select the fields you want to display for the corresponding search results
- You can save the changes by clicking the ‘Save’ button
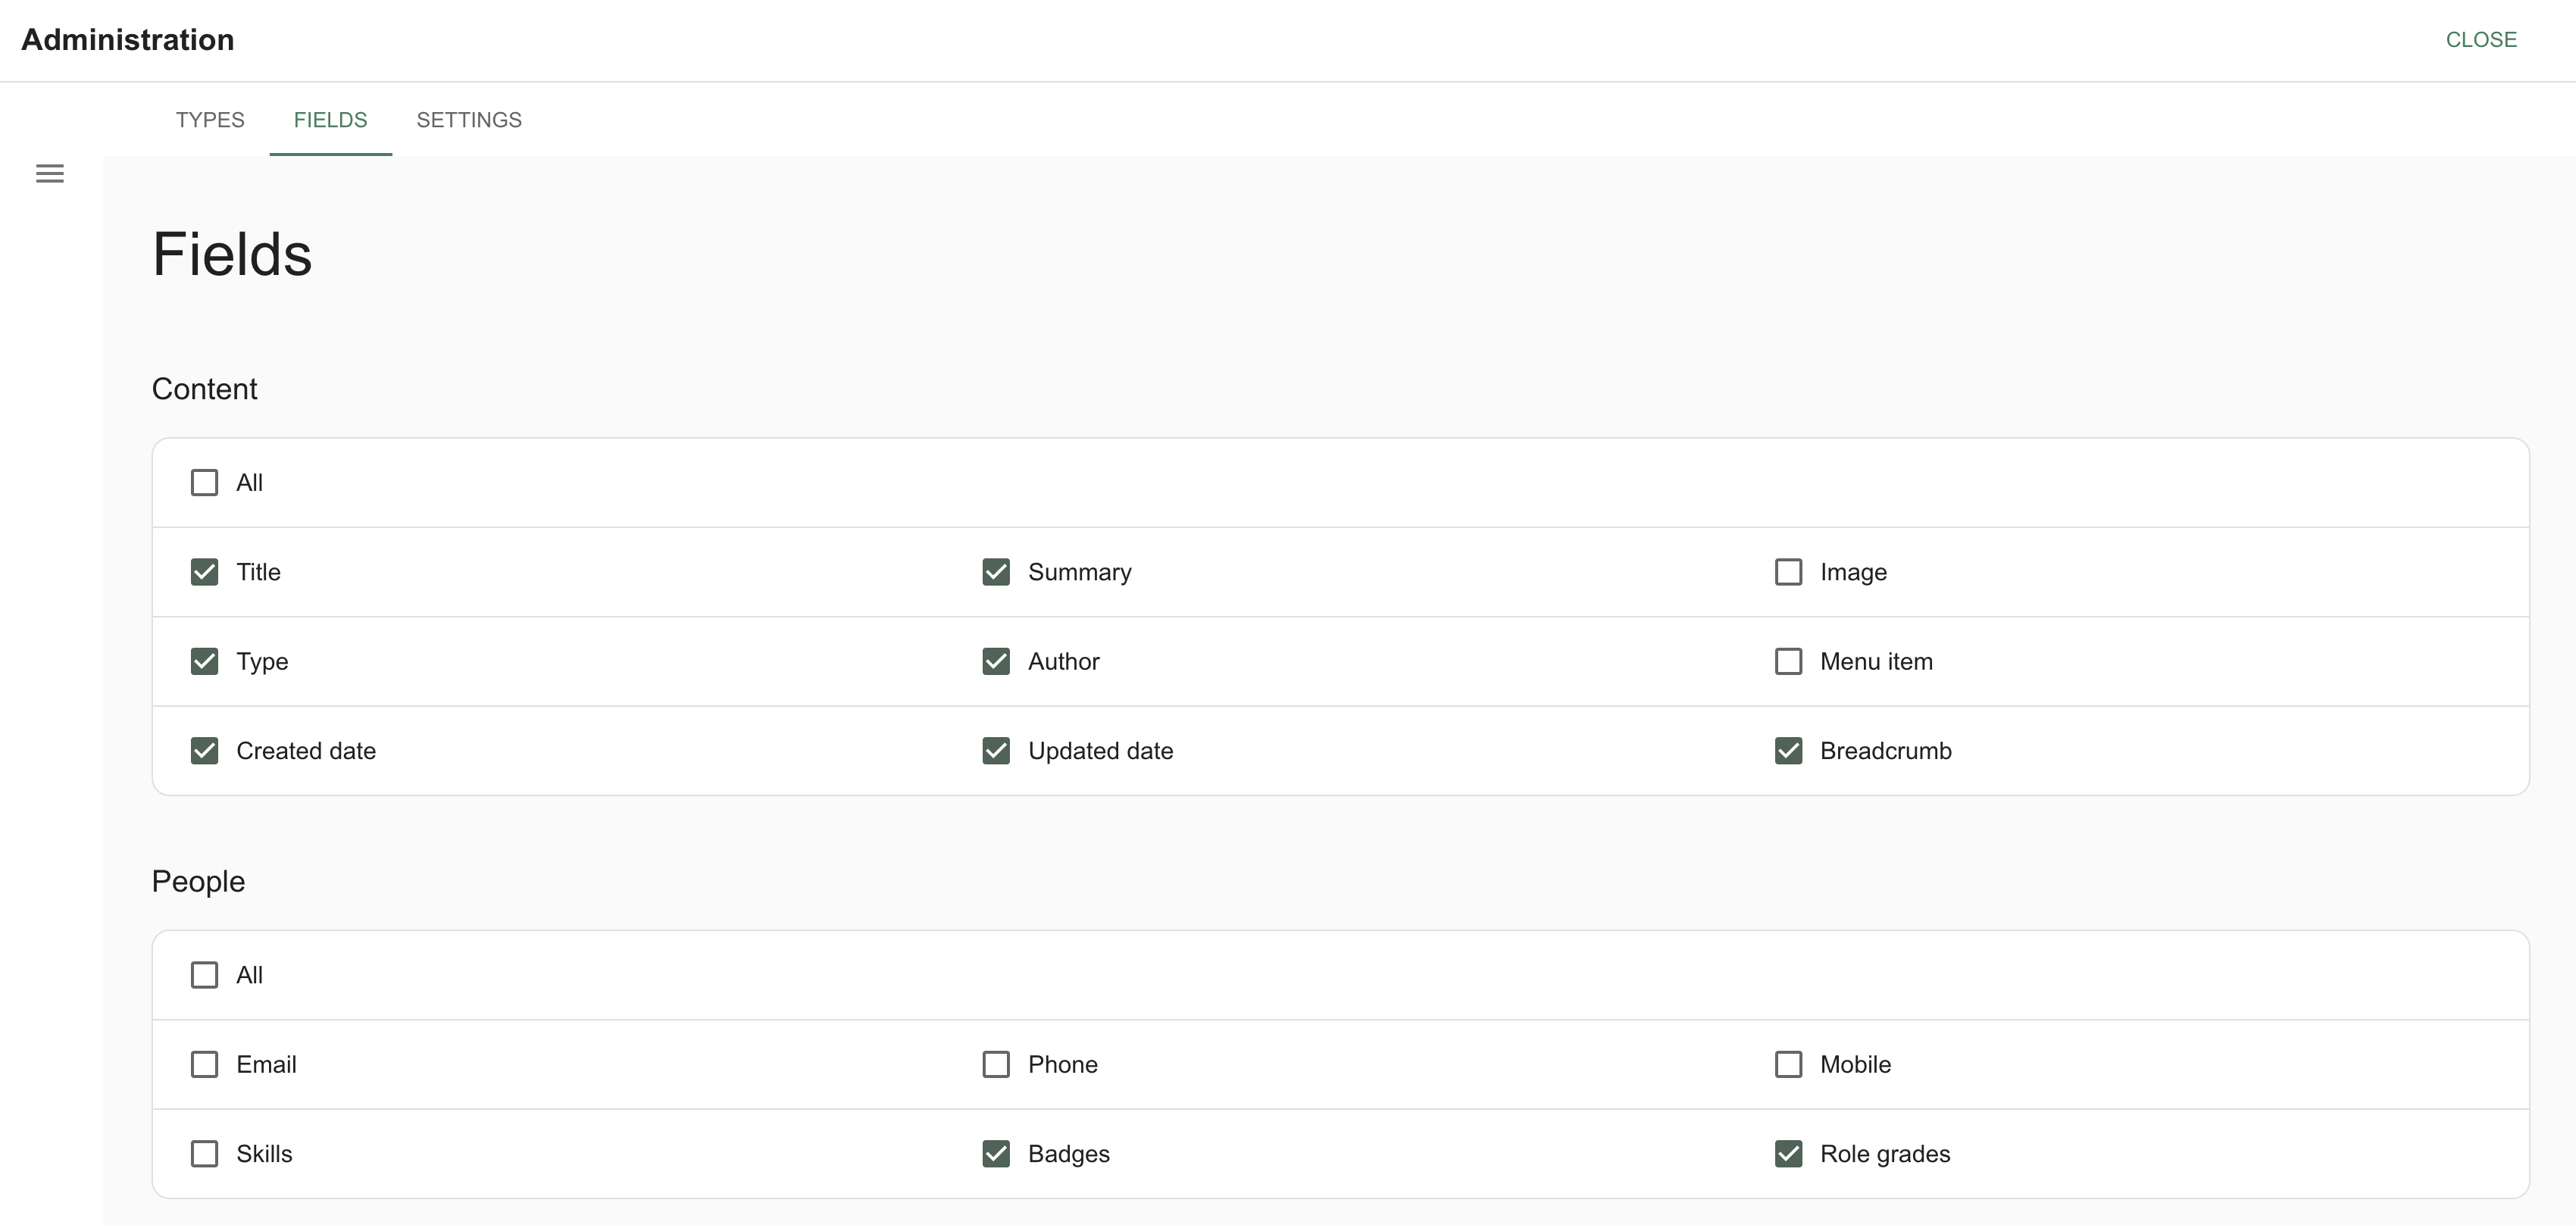
Field options for Search result cards
Couldn't find what you're looking for?
We're here to help. Please raise a support request via our help desk and we'll get back to you asap